Sentry
provides many user-customizable settings to change program behavior:
Appearance
Messages Security
Logging
Customization ScreenSavers
About Sentry2Go
Appearance
Tab - Changing Fonts, Colors, Themes
New in
Sentry 2.3 is the ability to create your own "themes". This means you can now
tell Sentry exactly what you want it's colors and fonts to look like. Sentry
comes with a few pre-made themes, including the classic Green & Black look, and
softer color schemes that might have a more business-like feel.
|
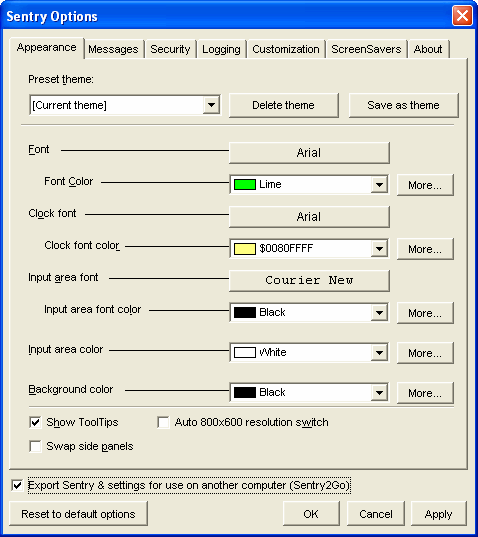
To begin making your
own Sentry theme, you should start with a template or preset. Click the
"Preset theme" dropdown box and select any item to show the
colors and fonts that it uses.
Next, change the
attributes of the theme by clicking buttons and dropdown boxes below.
For example, to
change the font used to draw Sentry's uptime and system time clock,
click this button. A font
dialog-box will appear.
Then, to change the
color of that font, select a common color from the dropdown box
located here,
or click the
"More
" button next to it to choose a custom color.
When you are done
editing the colors and fonts, click "Save as theme" and enter a
name for your theme.
Remember, any time
you want to quickly change colors, just choose a theme from the "Preset
theme" dropdown box above. |

|
Other options in the "Appearance" tab
In
addition to the theme editor, the Appearance tab in the options window also has
three additional options. You can toggle
each option on or off by checking their boxes.
Auto
800x600 resolution switch:
By enabling this option, Sentry automatically changes your screen size so that
Sentry has the best possible fit. After exiting Sentry, your original screen
size will be restored.
Show
ToolTips:
Displays little yellow "hints" explaining an objects function after you hover
your mouse over it.
Swap
side panels:
Instead of the Message panel being on the left and the Sentry panel being on the
right, enabling this option makes the Sentry Panel on the left and the Message
panel on the right.
Messages
Tab
- Away Messages, Leaving Messages
The
first section of Sentry's option window sets preferences for two things:
1) Your
"away" message that lets passers-by know information such as why you are not at
your computer, where you have gone, and when you will be back.
2)
Settings for how people can leave messages for you when you return to your
computer.
Each
option on this tab will be explained below.
|
Show away message
Check this box to display a message at the top of Sentry's main screen
to inform things such as other people why you are not at your desk,
where you have gone, and when you will be back.
Prompt to enter away
message at startup
When checked, asks you to enter an away message or choose from a
preset when Sentry starts.
Default away message
Enter the away message you would like to be shown by default when
Sentry is running.
Messages
Click this button to edit and choose from up to 10 preset away
messages.
Style
Click this button to change the properties of the Default away message
text field.
Let users leave me a
message
Check this box to allow passers-by to
leave you messages to read when you return to your computer.
Message Icon
This is the icon that will be displayed to represent each message that
has been left for you. You may use the built in icon, or choose your own
16x16 bitmap.
Include name besides
icon
When checked, shows the name of the person who left the message next to
the icon.
|
 |
|
Toolbar should be on
Choose the position you would like the toolbar to be placed in the
"Leave a message" window.
Extra Name & Subject
fields
Checking this box will provide a place for people to enter their name
and subject of a message, in addition to the message text itself.
Window Size
Adjust the height and width of the
"Leave a message" window. Measured in pixels.
Fonts and Colors
Font
Click this button to change the font used in the
"Leave a message" window.
Font color
Click this button to change the font's color to something other than
the standard colors.
Background color
Click this button to change the color of the input fields used in the
"Leave a message" window.
Preview
Click this button to preview what the
"Leave a message" window will look like to others when they want to
leave you a message.
|
Security
Tab
- Windows StartUp behavior, SentryLaunch
The
Security tab in Sentry's options dialog contains settings used to determine when
Sentry will automatically lock down and secure your desktop.
Each
option is described below in detail.
|
Run at Windows
Startup
Check this panel to have Sentry automatically secure your machine each
time Windows starts.
Prior to loading
Explorer Interface
Has Sentry start immediately, before any other programs can be loaded
or anything done in Windows. This is the recommended setting.
As a normal startup
program
Sentry loads at the same priority level as other "auto start"
applications. Your desktop will most likely be exposed for a couple
seconds.
Use SentryLaunch
Check this panel to use SentryLaunch, a program that will instantly
load Sentry when you click its icon in the system tray. SentryLaunch
will also load Sentry after a few minutes of idle time, much like a
Windows screensaver. (See also:
SentryLaunch)
Load Sentry
On mouse event
Single click
Launches Sentry after clicking on the SentryLaunch icon only once.
Double click
Launches Sentry after clicking on the SentryLaunch icon twice
(double-click).
Explicitly through
menu
Launches Sentry only after right-clicking the SentryLaunch icon, and
choosing "Launch Sentry" from the popup menu. |
 |
|
On hotkey event
Here you can define a hotkey (a combination of keys pressed, such as
Ctrl, Alt, and S) that will automatically load Sentry, in addition to
the mouse event you specified above. To set this hotkey, click into the
input field under "On hotkey event", and hit the key sequence while the
cursor is blinking in that field.
Auto Hide non-Sentry
windows
Prevents other windows from popping up over Sentry while Sentry is
running.
Change Sentry
password
Changes your master password.
|
Logging
Tab
- Recording Security Events to File
The
logging tab in Sentry's options dialog contains settings for the maintaining of
a log file, which will record events of your choice.
Additionally, the "Show access attempts in Sentry window" option is located in
this tab. When enabled, whenever a bad password is entered, Sentry will displays
on the main screen the time of the failed access attempt and the password used.
Each
option is described below in detail.
|
Log activity to file
Check
this panel to enable the log file, which records events as they happen
to a file that can later be reviewed.
What to log:
Sentry start and end
Log file writes an entry when Sentry starts and stops protecting your
system
Incorrect passwords
Log
file writes an entry each time an incorrect password is entered to view
messages, change options, or to exit Sentry.
Leaving of messages
Log file writes an entry each time a message is left.
Changes in options
Log file writes an entry whenever options are changed.
Limit size of log
file
When this option is enabled, Sentry will limit how large the log file
can become. Whenever the file exceeds the specified size, Sentry will
archive the old log file and start a new one.
Change archive index
Change
the current index of archived log files. You will normally never need
this option.
Show security events
in Sentry window
- When enabled, Sentry will display information on security events on
the main screen as they happen. An example of a security event is a bad
password being entered. In such cases, the incorrect password will be
shown on the main screen.
|
 |
Customization
Tab - Changing Sentry's
graphics
Sentry
provides the option of placing 3 custom graphics on the main window, such as
company logos, slogans, or other images.
|
Setting custom
graphics
Note the thumbnail
image that shows where the custom graphics will appear on the main
Sentry window.
To enable a custom
graphic:
1)
Check the item you wish to pick an image for.
2)
Click the browse button on the corresponding field to browse for
an image file.
|

|
|
3)
A dialog box like the one below will appear. Chose a file and
click open.
 |
|
| |
|
|
|
 |
Results
After selecting the
desired image, your custom graphic is now loaded in the position you
chose. |
ScreenSavers Tab - Run ScreenSavers
within Sentry
|
The ScreenSavers tab
in Sentry's option window provides settings for allowing ScreenSavers to
run within Sentry's secure environment.
To let ScreenSavers
run within Sentry, check the panel marked "Allow Screen Savers to run
over Sentry".
Below, a list of
installed ScreenSavers will appear. Select the one you want to use as
the default ScreenSaver.
Each option is
described below in detail. |
 |
Allow ScreenSavers to run over Sentry
Check this panel if you want ScreenSavers to be shown while Sentry is running.
Default ScreenSaver to use in Sentry
Here a list of ScreenSavers installed on your system is displayed.
Add
Click to manually add another ScreenSaver not displayed in the list.
Edit
Click to edit the name and file location of the currently selected ScreenSaver.
Delete
Click to remove the currently selected ScreenSaver from the list.
Scan drive
Click to have Sentry search your computer for installed ScreenSavers. The list
will be rebuilt to reflect what Sentry found.
Configure
Click to bring up preferences and options for the selected ScreenSaver.
Preview
Click to preview the currently selected ScreenSaver. Moving your mouse will
take you back into Sentry.
Start ScreenSaver automatically after Sentry first Starts
When checked, this option will automatically start the default (currently
selected) ScreenSaver whenever Sentry is protecting your computer.
Wait n seconds before
starting Delays
starting a ScreenSaver for the specified amount of time.
ScreenSaver button style
On the main Sentry screen, a button is displayed that lets you start or
restart a ScreenSaver in Sentry. Selecting Simple will make this a plain
button, always launching the default ScreenSaver. Selecting Combo will
add a dropdown list to the button, which will show other ScreenSavers to start.
About Tab - Sentry Version Information, Registering
Sentry
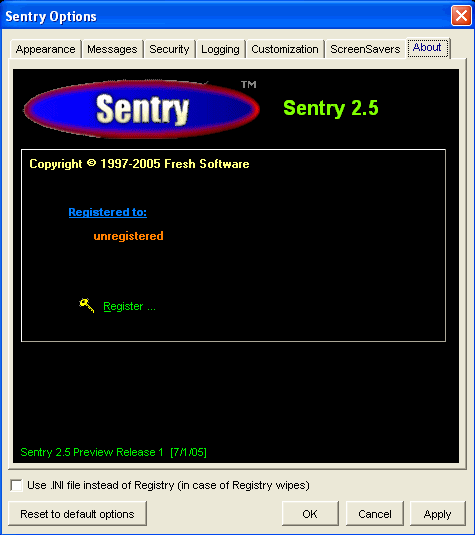
The about
tab displays version information, and who the copy of Sentry is registered to.

|
Sentry2Go - Exporting Settings & Using Sentry on another computer
If you need to use a
public computer such as in a computer lab, you may be interested in the
Sentry2Go feature. Many times these labs do not allow you to lock
your workstation, and if you need to get up from your workstation your
work is open for the world to see.
Sentry2Go copies &
exports the Sentry program file and settings to the disk drive of your
choice (usually a removable media drive such as a USB Flash Drive or
floppy disc), so you
can lock down any Windows computer you use.
To use this feature, check the Export Sentry &
settings for use on another computer (Sentry2Go) checkbox at the
bottom of the Options screen before clicking OK.
|
 |
|
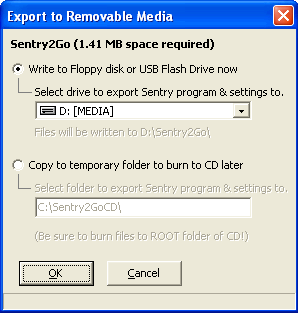
The following dialog
box will appear, where you can export Sentry2Go two ways:
1) Floppy disk or USB Flash Drive (or
other removable media)
The default option
is to export Sentry immediately to a writable drive.
Pick which drive to write to in the
dropdown box and click OK. The files will be placed in the
\Sentry2Go folder.
If you export Sentry2Go onto a USB
drive, and it is inserted into a computer with Windows XP Service
Pack 2 or later, an option will be provided to lock down the
computer immediately.
2) Burn to CD later
Choose this option
if you want to put Sentry2Go on a CD.
Pick a temporary place to write the
Sentry2Go files to (by default, C:\Sentry2GoCD) , and click
OK.
After exiting Sentry, use your favorite burning program
to burn the entire contents of the folder to the
ROOT/top level folder of your new CD.
After inserting the
finished CD into a computer, Sentry will lock the computer down,
assuming AutoRun is on.
The password will be your Sentry password at the time the CD was
created.
|
 |


